DIY Gel Manicure at Home in 3 Easy Steps: The 2026 Beginner's Guide
Maria MGA good DIY gel manicure used to mean a compromise — cheaper than the salon, but never quite as polished. That stopped being true a few years ago, and in 2026 the gap has essentially closed. With pro-grade gel nail polish and the right three-step method, you can sit down at your kitchen table in Brooklyn, Austin, or Seattle and walk away with a manicure that lasts two to three weeks. This guide breaks the process down to the absolute essentials: three steps, no jargon, no twenty-minute YouTube detour. It's the method nail enthusiasts in New York, Los Angeles, Chicago, and Miami actually use at home — and the one Madam Glam's formulas were built for.
Why DIY Gel Manicures Are Winning in 2026
A standard salon gel manicure in NYC or San Francisco now runs $55 to $95 before tip. Over a year, that's $1,500 or more. A complete at-home gel nail polish setup — lamp, base, top, and a handful of shades — costs less than three salon visits and pays itself off by month two. The math is why DIY gel has become the default for busy professionals in Chicago, Dallas, and Atlanta who want great nails without the chair time.
The other shift is formula quality. A decade ago, drugstore semi permanent nail polish peeled in four days. Today, pro-grade formulas from brands like Madam Glam — the same ones stocked in salons — are sold direct to enthusiasts. You're not buying a watered-down retail version. You're buying the same bottle the tech is using. That's the difference between a five-day manicure and a three-week one.
Ready to start? Browse the Gel Nail Polish Collection or the Best Sellers to pick your shades before you set up.
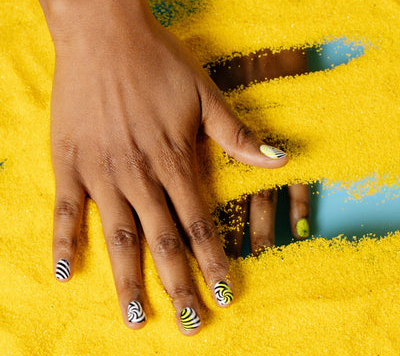
The 3-Step Easy Method (This Is Everything You Need)
The entire process is three steps. Prep. Apply. Cure. Everything else is a variation. Follow this order, don't skip, and your at-home gel manicure will last.
Step 1: Prep
Prep is 80% of whether your manicure lasts. Five minutes here saves you two weeks of peeling.
Push back your cuticles gently with a wooden orange stick. Shape your nails — square, oval, almond, whatever you like — and lightly buff the shiny top layer off the nail plate. This is the single most-skipped step in DIY gel, and the single biggest cause of lifting in Miami humidity, Phoenix dry heat, or Seattle damp. Wipe the nail clean with a lint-free pad and rubbing alcohol (or a proper nail dehydrator if you want to get serious). Your nails should feel bone-dry before a single drop of gel touches them.
If your hands were in lotion, hand sanitizer, or hot water in the last thirty minutes, wash with a non-moisturizing soap and re-wipe with alcohol. This one detail separates a lasting manicure from a frustrating one.
Step 2: Apply
Here's where you have a choice: the classic three-bottle system (base, color, top) or the one-step gel shortcut.
Classic system: Apply a thin layer of base coat, cure for 30 to 60 seconds under an LED lamp, then two thin coats of your chosen gel nail polish — curing between each — and finish with a top coat, cured one more time. The key word is thin. Thick coats are the second-biggest cause of peeling after bad prep. Two thin coats always beat one thick one.
The faster way: a one-step gel. This single bottle replaces base, color, and top, cutting your application time roughly in half. For a busy weeknight manicure in Boston or Denver, it's the move. The one step gel category is a genuine Madam Glam differentiator — not every brand makes one that truly holds up, and the ones that do tend to be the pro-grade formulas.
Whichever system you use, keep the gel off your skin. Gel on the cuticle or sidewall is the number-one reason a DIY manicure lifts. If you flood the cuticle, clean it up with a small brush dipped in alcohol before you cure.
Step 3: Cure and Finish
Cure each coat under an LED lamp — 48W or higher is the 2026 standard. Follow the bottle's cure time exactly. Under-curing is invisible for the first 24 hours, then shows up as peeling on day four.
After the final cure, some top coats need a swipe with a lint-free pad and alcohol to remove the sticky inhibition layer. A no-wipe top coat skips this step entirely and gives you a glass-like finish straight from the lamp — the no wipe top coat for chrome formulas are especially good for this.
Finish with cuticle oil. This isn't optional. Cuticle oil keeps the skin around the nail flexible, which is what prevents lifting as your nails grow out. Apply it morning and night for the first week.
That's it. Three steps. Prep, apply, cure. A full manicure takes 25 to 40 minutes once you have the rhythm.
One-Step Gel vs Traditional: Which Is Easier for Beginners?
For a brand-new DIY enthusiast in Nashville, Las Vegas, or Houston, the one step gel is the easier entry point. Fewer bottles, fewer cures, fewer ways to mess up. The trade-off is slightly less pigment control — you can't layer sheer washes or customize opacity the way you can with a separate color gel.
Once you've done ten manicures with a one-step, graduating to the classic base-color-top system takes one attempt to learn. Most enthusiasts end up with both: a one-step for weeknight touch-ups and a three-bottle system for weekend projects and trend colors like chrome, magnetic cat eye gel polish, or the glazed donut look.
When you're ready for effects, explore the Cat Eye Gel Collection and Chrome and Effects — both add the kind of finishes you see all over Instagram without needing a pro kit.
Madam Glam vs Olive and June, Beetles, and Sally Hansen
This is the comparison every DIY manicurist makes in 2026. Here's the straight version.
Olive and June gel nail polish markets beautifully and has a strong brand — but the price per bottle is steep, and the shade range is narrower. As a Madam Glam comparison, Madam Glam wins on shade variety and cost per bottle, particularly across nudes, chromes, and builder formulas. Beetles gel is the volume budget play and sells well because of the low price, but the formula thickness and longevity are a clear step below pro-grade lines. Sally Hansen lives at drugstore price points with drugstore performance.
Madam Glam's positioning sits in a different spot: salon-grade formulas and wide shade range, sold direct to enthusiasts and pros at a price that undercuts OPI, Gelish, and CND Shellac while outperforming most budget DIY brands. As an OPI alternative, Gelish dupe, or upgrade from beetles gel, the value math is hard to argue with.
Also worth noting: Madam Glam's entire gel line is HEMA-free and TPO-free, which matters if you've ever had a reaction to a drugstore gel or if you're sensitizing over time. HEMA free gel polish and TPO free gel polish is the regulatory direction — starting here means you won't be replacing your stash in a year.
The Gear List (Keep It Short)
Starter DIY kits get bloated fast. Here's what you actually need for 95% of manicures:
A 48W+ LED lamp. One base coat. One top coat (a no-wipe is easiest). Three to five gel nail polish shades you'll actually wear — resist the urge to buy fifteen. A soft-side buffer, a glass nail file, wooden orange sticks, lint-free pads, 99% isopropyl alcohol, and cuticle oil. That's the full kit. Total cost: under $150 if you shop smart.
If you want to upgrade later, add a clear builder gel for structure on weak nails, a cat eye gel polish for magnetic effects, and a chrome powder for mirror finishes. Those three additions unlock almost every viral nail look you'll see this year. Browse Nail Art Supplies and New Arrivals for the current lineup.
How to Make It Last Three Weeks
A DIY manicure that peels at day five usually fails for one of four reasons. You skipped the buff-and-wipe prep. You flooded the cuticle. You under-cured. Or you forgot cuticle oil. Fix those four things and your manicure lasts.
Environmental factors matter too. Hot showers, dish soap, and yard work all accelerate wear. Rubber gloves for dishes in your kitchen in Atlanta or Boston add a week to any manicure. Sunscreen on the hands is underrated in LA and Phoenix — UV yellowing is real on white and nude shades. Reapply cuticle oil daily.
When you're ready for a change, a proper soak-off with acetone-saturated cotton pads wrapped in foil for 12 to 15 minutes removes most soak-off gels cleanly. Don't peel. Peeling strips the top layer of the nail plate, which is what makes people think gel "ruined" their nails — it wasn't the gel, it was the removal.
What Real DIY Enthusiasts Are Saying
"I was paying $75 every two weeks in Manhattan. Switched to Madam Glam's one step gel and a $60 lamp, and my nails have never looked better. Three weeks of wear, zero lifting." — Chloe, New York
"I tried olive and june and beetles gel before I found Madam Glam. The shade range alone won me over — but the fact that it actually lasts is why I'm never going back." — Angelica, Miami
"Honestly the easiest DIY system I've used. Three steps, done. My friends in Seattle keep asking who does my nails and I love telling them I do." — Hayley, Seattle
Shop the Starter Lineup
If you're building your first DIY gel nail polish kit this week, start with a clear builder gel for structure on thin nails, a flattering nude from the Gel Nail Polish Collection, and a one-step gel in your most-worn shade. Add a top coat and you have a complete kit. That's it.
Pro-grade formulas, HEMA-free and TPO-free, priced so you can afford to actually use them. Shop the full lineup at madamglam.com, or jump straight to the Best Sellers if you want the shortcut to what everyone in NYC, LA, Chicago, and Miami is already buying.
Three steps. Three weeks of wear. Salon-quality at home, 365 days a year.